
Would you like your outdoor wood furniture to look refreshed, protected, and ready for the season?

This image is property of Amazon.com.

Furniture Clinic Garden Furniture Restoration Kit | For Outdoor Wood Patio Furniture Such as Teak & Other Wood Types | Clean, Remove, Brighten, Nourish, and Protect Treated and Untreated Surfaces — Full Review
You’ll find this kit stacks every basic step you need to restore and maintain outdoor wood furniture in one package. This review walks you through what’s included, how the three-step system actually works, and whether it will save you time and money compared with other options.
What’s included in the kit
You’ll notice the kit is organized around three main bottles — Cleaner, Brightener, and Oil — plus applicators and simple instructions. Everything is sized and labeled to guide you through the sequence: clean first, brighten if needed, then oil to protect and nourish the wood.
| Item | Purpose | Quick note |
|---|---|---|
| Teak Cleaner (liquid) | Removes dirt, grime, and surface contaminants | Mix at 1:5 with warm water; scrub and rinse |
| Teak Brightener (liquid) | Restores and enhances natural color after cleaning | Mix at 1:1 with water; apply, wait briefly, then rinse |
| Teak Oil (liquid) | Nourishes, seals, and protects wood, restoring warmth and tone | Apply liberally, wipe off excess, allow 4–6 hours to dry |
| Scrubbing brush | Helps loosen ingrained dirt and surface grime | Use bristles appropriate to wood surface to avoid damage |
| Lint-free cloths | For wiping, applying oil, and finishing | Use multiple cloths for different stages to avoid contamination |
| Protective gloves (sometimes included) | Protects your hands from chemicals and absorption | Always use gloves and follow safety steps |
You’ll be able to see how the three elements work together once you start using them. If you prefer modular steps, the kit’s design makes it easy to use only the pieces you need.
Award and general suitability
You’ll like that this kit won the 2022 DIYWeek award for garden restoration products, which reflects consistent user satisfaction and effectiveness. It’s specifically made for teak but is also safe for use on other outdoor woods, whether they’re treated or untreated.
How the three-step system works
You’ll follow a simple, repeatable workflow: clean, brighten (if needed), then oil. This ensures that contaminants are removed, the wood color is restored or enhanced, and the oil penetrates a clean surface for best protection.
Step One — Cleaning (Teak Cleaner)
You’ll mix the Teak Cleaner with warm water at a ratio of 1:5 (one part cleaner to five parts warm water). Use a scrubbing brush to work the solution into the grain, wipe with a lint-free cloth, then rinse thoroughly with clean water to remove residue.
You’ll find cleaning removes surface grime, pollen, mildew stains, and general buildup that hides the wood’s natural tone. Proper cleaning also prepares the surface so the brightener and oil perform effectively rather than sitting on a layer of dirt.
Step Two — Brightening (Teak Brightener)
You’ll use the Teak Brightener mixed at 1:1 with water to enhance the wood’s natural color and neutralize greyed or weathered surfaces. Put the solution on a lint-free cloth, apply with the grain, leave it for a few minutes, then rinse off to reveal a brighter, more even tone.
You’ll appreciate brightening when furniture has become dull or silvered from UV exposure and weathering. You don’t need to use this every time; it’s ideal when wood looks especially weathered or if several seasons of neglect have left the surface greyed.
Step Three — Oiling (Teak Oil)
You’ll apply the Teak Oil liberally with a lint-free cloth to dry, clean wood and work it into the grain following the wood’s direction. After a few minutes, wipe off excess oil and allow the surface to sink in and dry for 4–6 hours; three coats are recommended for best results.
You’ll notice oiling restores warmth and gives the wood a more finished look while adding a protective layer against moisture and UV. Regular oiling reduces the frequency of intensive restoration and keeps the wood looking cared for.

This image is property of Amazon.com.

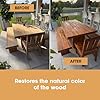
Performance: cleaning, brightening, and oiling explained
You’ll want to know whether the kit actually changes the look and longevity of your furniture. In practice, each component performs its intended role — cleaner lifts dirt, brightener counteracts greying, and oil restores color and helps repel moisture.
Cleaning performance
You’ll find the cleaner concentrates on breaking down grime and old residues, which are the biggest barriers to any restoration. When used correctly it provides a dramatic “before and after” improvement, especially on teak that’s only surface dirty rather than deeply worn.
You’ll want to use moderate pressure with a brush so you remove debris without abrading softer wooden areas. It’s effective against pollen, dust, and typical garden soil but heavy stains or deep mildew may require repeat treatments or light sanding.
Brightening performance
You’ll get visible color improvement when you use the brightener after cleaning, particularly on greyed or weathered surfaces. The brightener helps neutralize oxidized layers and brings back a warmer, more uniform tone that looks healthier.
You’ll sometimes see uneven results on very old wood that has patchy weathering; in those cases, additional treatments or selective sanding may be needed. Brightening should not be used as a substitute for cleaning — always apply it on a clean surface for consistent results.
Oiling performance
You’ll notice oiling provides immediate visual improvement: the wood looks richer and less dry after one coat. When you apply three coats as recommended, the finish becomes more resilient and future maintenance is simplified.
You’ll benefit most when oiling is done on a clean surface and in suitable weather conditions (dry and mild). If you apply oil in high humidity or allow it to remain tacky, you may trap moisture or attract dirt; following the timing guidance reduces those risks.
Ease of use and time commitment
You’ll find the kit is designed for homeowners and DIYers rather than professional restorers, with steps that are practical for a weekend project. The directions are straightforward and the mixing ratios are easy to remember.
Time per step
You’ll spend most of your time on cleaning and allowing drying between stages. Expect an active cleaning and brightening time of a few hours, and allow 4–6 hours drying time for oil between coats, with three coats ideally spread across a day or two.
You’ll want to plan for the entire job to take a full day if you’re doing a small set, or a weekend for larger pieces and multiple coats. Consider weather: choose a dry day with moderate temperatures so oils have time to soak in and cure properly.
Skill level required
You’ll be able to use this kit with basic DIY skills and minimal tools — mainly a brush and lint-free cloths. No specialized training is needed, but careful following of directions and safety precautions (gloves, ventilation) will give the best results.
You’ll find the most challenging parts are time management and patience while waiting for oils to dry between coats. If you’re comfortable washing and treating wood surfaces, this kit follows familiar, repeatable steps.

This image is property of Amazon.com.
Which woods is this kit suitable for?
You’ll be reassured that the kit is made for all types of garden furniture, with a strong emphasis on teak but safe for other outdoor woods. Treated and untreated surfaces both respond well, making the kit versatile if you have mixed-material furniture.
Teak
You’ll get excellent results on teak since the oil and brightener are tailored for its open grain and oil-absorbing nature. Teak normally responds well to oiling by regaining its natural golden-brown tone rather than remaining silvered.
You’ll still need to assess the condition: very old or badly weather-damaged teak may require sanding to remove greyed fibers before brightening and oiling. For most standard maintenance cycles, however, cleaning and oiling alone will be sufficient.
Other hardwoods and softwoods
You’ll be able to use the kit on mahogany, oak, cedar, and other common outdoor woods, though absorption and finish will vary. Hardwoods with dense grain may take less oil per coat, while softer woods may soak up more and need additional coats.
You’ll want to test a small, inconspicuous area first when working on unfamiliar wood species. This helps you check for color shifts and ensures you like the result before treating an entire piece.
Maintenance schedule and long-term care
You’ll want to keep a simple annual routine: clean and re-oil once a year, and add brightening only when the furniture becomes notably weathered. This schedule balances protection with effort, keeping the furniture looking cared for without overworking it.
Annual routine
You’ll start each season or after winter by cleaning the furniture thoroughly and applying at least one coat of oil. If you keep to a yearly oiling routine, you’ll reduce the need for aggressive restoration and keep surfaces protected.
You’ll use brightener when the wood shows significant greying or uneven discoloration; otherwise you can skip brightening and proceed straight to oiling. Storing or covering furniture in harsh weather will lengthen the time between treatments.
Long-term expectations
You’ll find that with yearly maintenance the wood maintains color and resists deeper cracking, while neglected furniture will demand extra work like sanding or repeated brightening. Expect repeated oiling and occasional spot-cleaning to keep the surface consistently attractive.
You’ll also notice that regular care prevents moisture penetration and reduces the rate of UV breakdown, which is why annual oiling is a useful preventative step.

This image is property of Amazon.com.
A step-by-step guide you can follow
You’ll appreciate a clear, practical sequence to follow on the day you decide to restore your furniture. The steps below follow the kit’s intended use and add small tips to help you avoid common mistakes.
Preparation
You’ll want to work in a well-ventilated space and choose a dry day with temperatures between about 10–25°C (50–77°F). Gather protective gloves, a bucket, warm water, a scrubbing brush, several lint-free cloths, and an area to lay pieces flat for drying.
You’ll remove cushions and hardware where possible and check for loose joints so you don’t trap cleaning solution in crevices. Pre-rinsing heavily dirty items can reduce scrubbing time.
Cleaning (detailed)
You’ll mix the Teak Cleaner at 1:5 with warm water, following the product label’s safety instructions. Dip the brush into the mixture and scrub with the grain; then wipe and rinse thoroughly to remove all cleaner residue.
You’ll rinse until the water runs clear and there’s no slippery residue left on the wood. If stubborn stains remain, repeat cleaning rather than increasing chemical concentration.
Brightening (detailed)
You’ll apply the Teak Brightener mixed 1:1 with water using a cloth, rubbing with the wood grain and leaving it on for a few minutes before rinsing. Use gloves and avoid skin contact; the brightener is designed to react with the wood’s oxidized surface.
You’ll observe the color shift after rinsing; if the wood still looks uneven, a second brightener application or a light sanding in problem areas can help. Allow the wood to dry fully before moving to oiling.
Oiling (detailed)
You’ll apply Teak Oil liberally with a lint-free cloth, working it into the grain and following the wood’s direction. After a few minutes, wipe away excess oil and allow 4–6 hours drying time; repeat for two more coats for best protection.
You’ll avoid over-applying oil so the surface is not sticky and doesn’t attract dirt. If you do get a tacky surface, wipe with a clean cloth and allow more dry time before using the piece.
Practical tips and troubleshooting
You’ll run into common problems such as uneven color, tacky finishes, or persistent stains; these tips will help you manage them. Small adjustments and patience usually fix most issues.
Tackiness or sticky finish
You’ll prevent tackiness by wiping off excess oil after a few minutes and ensuring there’s adequate drying time between coats. If surfaces remain tacky, wipe down with a lint-free cloth and allow longer drying times; if needed, lightly buff with a clean cloth once dry.
You’ll want to avoid applying oil in cold or damp conditions since slow curing increases tackiness. Good ventilation and warm, dry weather help oil cure properly.
Uneven color or patchy results
You’ll get more even color by ensuring thorough cleaning and even oil application, and by using the brightener where greyed areas are present. Light sanding can remove severely weathered fibers so the finish absorbs oil uniformly.
You’ll test any more aggressive treatments on a hidden area to prevent surprises across the whole piece.
Heavy stains or mildew
You’ll sometimes need repeated cleaning passes for ingrained mildew or deep stains, and in severe cases mild sanding may be necessary. Make sure to neutralize and rinse brighteners thoroughly after any sanding and cleaning.
You’ll consult a professional for structural rot or deep decay that cleaning and oiling won’t correct.

This image is property of Amazon.com.
Safety and environmental considerations
You’ll want to use gloves and eye protection when handling the chemicals, and avoid contact with skin or ingestion. Work outside or in a ventilated area, and dispose of waste water and used rags responsibly to avoid fire risk and environmental impact.
Disposal and storage tips
You’ll store unopened bottles in a cool, dry place away from direct sunlight and extreme temperatures. For used rags soaked in oil, you’ll lay them flat to dry outside or keep them in a sealed metal container; do not leave them in a pile as they can self-ignite.
You’ll check local disposal rules for chemical-containing wastewater and unused product; many places require specific disposal methods to protect waterways.
Pros and cons
You’ll want a quick list to weigh whether this kit fits your needs, especially if you’re comparing it to professional services or individual product purchases. The kit balances convenience with proven results.
Pros
- You’ll get a three-step system that’s easy to follow and tailored specifically for outdoor wood furniture.
- You’ll be able to use it on teak and other wood types, making it versatile when you have several kinds of garden furniture.
- You’ll save money compared with hiring a professional for routine maintenance, and you’ll control the timing and frequency of treatments.
You’ll also appreciate the award recognition that suggests consistent outcomes across typical garden restoration projects.
Cons
- You’ll need to invest time for multiple coats and drying between treatments to get the best results.
- You’ll sometimes need extra tools (sanding pads, more cloths) or repeat treatments for very neglected pieces.
- You’ll not find exact coverage figures on every kit variant, which can make planning for large projects slightly uncertain.
You’ll have to plan by testing a small area first to estimate how many bottles you’ll need for larger sets.
Comparison with professional restoration and other kits
You’ll find this kit good for homeowner use and regular maintenance, while professional services are better for structural repairs or heavy restoration. Compared with single-item solutions (only oil or only cleaner), this kit simplifies the sequence and ensures compatibility between products.
DIY kit vs. professional service
You’ll save money performing routine maintenance yourself but should consider a pro if furniture has structural damage or widespread rot. Professionals also offer sanding, refinishing, and reassembly services that go beyond the scope of a bottle-based kit.
You’ll find many users prefer doing annual maintenance themselves and booking professionals for one-off deep restorations.
Kit vs. individual products
You’ll find convenience in an integrated set because cleaner, brightener, and oil are formulated to work together. Buying parts separately can offer flexibility but may increase the risk of mismatched products and require more research.
You’ll choose this kit if you want a single purchase that covers all basic steps without hunting for compatible brands.
Frequently asked questions (FAQ)
You’ll get answers to common concerns so you can plan and troubleshoot before starting the project. These quick Q&A items summarize the most typical points people ask about.
How often should I use the kit?
You’ll clean and re-oil once a year under normal conditions, and you’ll use the brightener only when the furniture looks markedly weathered. If furniture sits uncovered or in a harsh climate, you may need to treat it more frequently.
You’ll adjust frequency based on exposure to sun, rain, and pool chemicals that accelerate weathering.
Do I need to sand before using the kit?
You’ll only need sanding if the wood is heavily weathered, has raised or splintered grain, or if previous coatings are peeling. For routine maintenance and mildly weathered wood, cleaning, brightening, and oiling will usually suffice.
You’ll sand lightly with the grain to avoid gouging, and clean well before brightening and oiling.
Can I use the oil on painted or varnished items?
You’ll not use the teak oil on painted or varnished surfaces because it’s formulated to penetrate raw or open-grained wood. If you have previously varnished pieces, you’ll need to remove the old finish before applying teak oil.
You’ll test a small area first if there’s uncertainty about previous coatings.
Final verdict
You’ll find the Furniture Clinic Garden Furniture Restoration Kit | For Outdoor Wood Patio Furniture Such as Teak & Other Wood Types | Clean, Remove, Brighten, Nourish, and Protect Treated and Untreated Surfaces to be a practical, user-friendly choice for homeowners who want consistent, satisfying maintenance results. The three-step system is straightforward, award-recognized, and versatile for different wood types, and it gives you the control to restore and protect your outdoor furniture without a specialist.
You’ll enjoy the balance of convenience and effectiveness this kit offers, especially if you commit to the recommended routine and proper drying times. For most users, it delivers a visually noticeable improvement and extends the life of outdoor wood furniture at a fraction of the cost of professional restoration.
Quick checklist before you start
You’ll want to run through this short checklist so you’re ready on the day you apply the kit:
- Work in dry, mild weather and ventilated space.
- Gather gloves, bucket, brush, and several lint-free cloths.
- Remove cushions and loose hardware, and pre-rinse heavily dirty pieces.
- Follow the 1:5 cleaner and 1:1 brightener ratios, and allow 4–6 hours drying for oil.
- Plan for three oil coats for best results and annual maintenance thereafter.
You’ll find that preparation and patience are the two most important ingredients for a successful restoration. With those in place, the kit will help you keep your garden furniture looking cared-for and durable for seasons to come.

Disclosure: As an Amazon Associate, I earn from qualifying purchases.


Christopher Knight Home Esme Outdoor Acacia Wood Bench, Teak Finish
27% Off


Furniture Clinic Teak Oil | Wood Oil Protects & Cleans Outdoor & Indoor Furniture, Boats, Shower Benches | Restore & Protect Wood, Prevent Drying & Other Damage | Natural Matte Finish | 17oz/500ml
10% Off


Best Choice Products 3-Piece Acacia Wood Bistro Set, Folding Patio Furniture for Backyard, Balcony, Deck w/ 2 Chairs, Round Coffee Table, Teak Finish - Natural
11% Off


Christopher Knight Home Louver Club Chairs, Teak + Cream
$390.99 (as of March 6, 2026 02:24 GMT -05:00 - More infoProduct prices and availability are accurate as of the date/time indicated and are subject to change. Any price and availability information displayed on [relevant Amazon Site(s), as applicable] at the time of purchase will apply to the purchase of this product.)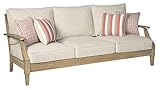


Signature Design by Ashley Clare View Outdoor Patio Sofa, 4 Throw Pillows, Nuvella Weather Resistant Fabric, Eucalyptus Wood, 81" W x 35" D x 32" H, Beige
$1,369.99 (as of March 6, 2026 02:24 GMT -05:00 - More infoProduct prices and availability are accurate as of the date/time indicated and are subject to change. Any price and availability information displayed on [relevant Amazon Site(s), as applicable] at the time of purchase will apply to the purchase of this product.)


Lokingrise 4-Piece Deep Seating Teak Wood Patio Furniture Set, Acacia Wood Outdoor Conversation Sofa Set with Cushioned Loveseat, Armchairs and Coffee Table for Garden, Deck, Backyard
$859.99 (as of March 6, 2026 02:24 GMT -05:00 - More infoProduct prices and availability are accurate as of the date/time indicated and are subject to change. Any price and availability information displayed on [relevant Amazon Site(s), as applicable] at the time of purchase will apply to the purchase of this product.)


Merax Outdoor Acacia Wood Conversation Set, 3-Seat Loveseat Sofa w/Coushion and Round Coffee Table for Backyard, Patio Furniture, Teak+Beige
$519.99 (as of March 6, 2026 02:24 GMT -05:00 - More infoProduct prices and availability are accurate as of the date/time indicated and are subject to change. Any price and availability information displayed on [relevant Amazon Site(s), as applicable] at the time of purchase will apply to the purchase of this product.)![[3 PIECE SET] This patio conversation set includes: 2 patio lounge chairs and 1 patio side table. [PREMIUM TEAK WOOD] Sourced from sustainable forests, our patio conversation set is expertly crafted from high-quality teak wood, ensuring both durabili...](https://m.media-amazon.com/images/I/61RlGdGcaiL._SL160_.jpg)


Cambridge Casual Robin Teak Wood 3 Piece Patio Conversation Set with Oyster Cushion
$994.70 (as of March 6, 2026 02:24 GMT -05:00 - More infoProduct prices and availability are accurate as of the date/time indicated and are subject to change. Any price and availability information displayed on [relevant Amazon Site(s), as applicable] at the time of purchase will apply to the purchase of this product.)


PURPLE LEAF 11 Pieces Patio Dining Set Wicker Outdoor Furniture Rectangular Table and Chairs Set for Garden Deck Teak-Finish Aluminum Frame Backyard Kitchen Set, Cushions and Pillows Included
$2,099.00 (as of March 6, 2026 02:24 GMT -05:00 - More infoProduct prices and availability are accurate as of the date/time indicated and are subject to change. Any price and availability information displayed on [relevant Amazon Site(s), as applicable] at the time of purchase will apply to the purchase of this product.)![[Versatile Outdoor Modular Sofa Set] This 6-piece acacia wood patio furniture set features a customizable L-shaped configuration with 3 armless chairs, 1 corner sofa, 1 ottoman, and 1 tea table – ideal for dynamic outdoor entertaining. The modular de...](https://m.media-amazon.com/images/I/51CUH9Yb9gL._SL160_.jpg)


Merax 6 Pieces Patio Furniture Set, Outdoor L-Shaped Sectional Sofa Set with Coffee Table, Acacia Wood Conversation Seating & Cushions and Lumbar Pillows, for Garden, Poolside and Backyard, Teak+Beige
$899.99 (as of March 6, 2026 02:24 GMT -05:00 - More infoProduct prices and availability are accurate as of the date/time indicated and are subject to change. Any price and availability information displayed on [relevant Amazon Site(s), as applicable] at the time of purchase will apply to the purchase of this product.)
Now retrieving an image set.
EconoHome 4-Piece Outdoor Patio Furniture Set - Patio Set with 2 Rattan Chairs, 1 Loveseat & 1 Glass -Top Coffee Table - Weather-Proof Wicker with Cushions - Conversation Set for Porch, Balcony, Lawn
$142.99 (as of March 4, 2026 17:21 GMT -05:00 - More infoProduct prices and availability are accurate as of the date/time indicated and are subject to change. Any price and availability information displayed on [relevant Amazon Site(s), as applicable] at the time of purchase will apply to the purchase of this product.)
Now retrieving an image set.
Greesum Patio Furniture 4 Pieces Conversation Sets Outdoor Wicker Rattan Chairs Garden Backyard Balcony Porch Poolside loveseat with Soft Cushion and Glass Table, Brown and Beige
$142.99 (as of March 4, 2026 17:21 GMT -05:00 - More infoProduct prices and availability are accurate as of the date/time indicated and are subject to change. Any price and availability information displayed on [relevant Amazon Site(s), as applicable] at the time of purchase will apply to the purchase of this product.)
Now retrieving an image set.
Valita 3-Piece Outdoor PE Rattan Furniture Set Patio Black Wicker Conversation Loveseat Sofa Sectional Couch Gray Cushion
$149.99 (as of March 4, 2026 17:21 GMT -05:00 - More infoProduct prices and availability are accurate as of the date/time indicated and are subject to change. Any price and availability information displayed on [relevant Amazon Site(s), as applicable] at the time of purchase will apply to the purchase of this product.)
Now retrieving an image set.
Tangkula 3 Pieces Patio Furniture Set, PE Rattan Wicker 3 Pcs Outdoor Sofa Set w/Washable Cushion and Tempered Glass Tabletop, Conversation Furniture for Garden Poolside Balcony (Beige)
$169.99 (as of March 4, 2026 17:21 GMT -05:00 - More infoProduct prices and availability are accurate as of the date/time indicated and are subject to change. Any price and availability information displayed on [relevant Amazon Site(s), as applicable] at the time of purchase will apply to the purchase of this product.)
Now retrieving an image set.