
Want to bring your teak patio furniture back to life with one easy kit?

This image is property of Amazon.com.

First impressions of the Furniture Clinic Teak Care Kit | For Teak Outdoor Wood Patio Furniture | Clean, Brighten, Nourish, and Protect Treated and Untreated Wood | Contains Cleaner, Brightener, & Oil
When you pick up the Furniture Clinic Teak Care Kit you’ll notice that it’s compact and focused: three 17 oz bottles labeled Cleaner, Brightener, and Oil. The packaging and the product descriptions make it clear this is designed for the typical homeowner who wants a complete three-step process without buying separate bottles from different brands.
The kit is meant to be a one-stop solution for cleaning, restoring color, and protecting teak. Because each component is matched to the next, you’ll find the instructions straightforward and consistent, which helps reduce guesswork when you’re working on a whole set of chairs, a table, or mixed outdoor pieces.
What’s included
You’ll find three 17 oz (about 500 ml) bottles in the kit: Teak Cleaner, Teak Brightener, and Teak Oil. The kit does not include tools like a lint-free cloth, scrub brush, or bucket — those are sold separately in the Garden Restoration Kit.
Knowing what’s not included is important because you’ll need to add a few inexpensive items before you start. Plan for a scrub brush, clean lint-free cloths, a bucket for mixing solutions, gloves, and possibly some light sandpaper depending on the condition of your furniture.
Contents breakdown
Below is a simple table to help you visualize what the kit contains and what else you’ll likely need.
| Item included | Size | Purpose | You may need to add |
|---|---|---|---|
| Teak Cleaner | 17 oz (500 ml) | Removes dirt, grease, and weathered grime prior to brightening and oiling | Scrub brush, bucket, gloves |
| Teak Brightener | 17 oz (500 ml) | Restores warm golden color and neutralizes tannins after cleaning | Lint-free cloths, gloves |
| Teak Oil | 17 oz (500 ml) | Nourishes and protects teak, enhances grain and color | Lint-free cloths, extra bottles for large sets |
| Not included | — | Necessary tools for application and rinsing | Scrub brushes, lint-free cloths, bucket, protective gloves |
This breakdown helps you budget the extras and avoid a mid-job trip to the store. If you already own basic garden tools, you’ll likely only need a few cloths and a bucket.

This image is property of Amazon.com.

How the three-step process works
The kit follows a sequential approach: clean first, brighten next, then oil. Each step prepares the wood for the next so you end up with a clean, color-corrected, and protected finish.
Following the sequence is important because brighteners work best on freshly cleaned surfaces and oil adheres and penetrates more predictably after both cleaning and brightening. Skipping a step can reduce the longevity and visual impact of the oil.
Step one — Cleaning
You’ll dust off loose dirt, then mix the Teak Cleaner at a ratio of 1:5 (one part cleaner to five parts warm water). Use a scrub brush to work the solution into the wood grain, wipe with a clean lint-free cloth, and rinse thoroughly with clean water.
This cleaning step removes oils, mildew, and embedded grime that can prevent brighteners and oils from doing their jobs properly. If your furniture is heavily soiled, you may repeat the cleaning once it’s dry before moving on to brightening.
Step two — Brightening
After the furniture dries, you’ll mix the Teak Brightener at a ratio of 1:1 with water and put on protective gloves. Apply with a lint-free cloth following the grain, leave it for a few minutes, and then rinse thoroughly to reveal the lightened, more natural teak color.
Brightening helps neutralize tannins and removes the grey-silver patina that forms on teak over time, especially when exposed to sun and rain. You won’t need the brightener every year; use it when the wood has noticeably weathered or if you skipped maintenance for a while.
Step three — Oiling
Make sure the wood is completely clean and dry before applying Teak Oil. Shake the bottle, apply oil liberally with a lint-free cloth following the grain, wait a few minutes, then wipe off any excess. Let the oil soak in and dry for 4–6 hours, and apply three coats for best results.
The oil both nourishes the wood and provides a protective barrier against moisture and UV to some degree. Applying multiple thin coats is better than one thick coat — it promotes penetration, avoids sticky surfaces, and gives a more even finish.
Performance and results you can expect
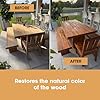
You should expect a noticeable change after the cleaning and brightening steps: greyed, weathered wood will look closer to its original warm tone once you proceed through the kit. The oil will deepen the grain and add a satin sheen that looks clean and natural rather than glossy or artificial.
Results depend on the initial condition of the teak: lightly weathered furniture will look dramatically refreshed, while very old or deeply stained pieces may need extra cleaning, light sanding, or additional oil to reach desirable results. In short, the kit handles typical household weathering well and is especially effective when you maintain regularly.
Surface types and compatibility
This kit is formulated for teak outdoor furniture but works on both treated and untreated teak. You’ll get the intended results on chairs, tables, benches, and slatted furniture, but you should be cautious using it on painted, laminated, or non-teak woods without testing a small inconspicuous area first.
If you have other hardwoods (like eucalyptus or oak), test the cleaner/brightener on a small area. The chemistry and color outcome can differ, so confirm compatibility before committing to furniture that isn’t teak.

This image is property of Amazon.com.
Ease of use
You’ll find the instructions clear and the application straightforward: mix, scrub, rinse, brighten, rinse, then oil. The process is work-intensive in the sense that cleaning and oiling require manual effort and drying time, but there isn’t a steep learning curve.
If you’re handy with basic cleaning and garden tasks, you’ll get through a chair or small table in an afternoon, factoring in drying times between steps. For larger sets you’ll appreciate the predictable ratios and the fact that the kit components are sized for multiple pieces.
Coverage and quantity estimates
Estimating coverage depends on the porosity and condition of the wood. As rough guidance:
- Teak Cleaner (17 oz) mixed 1:5 yields approximately 102 oz (about 3 liters) of cleaning solution, enough for several chairs or a small table and chairs set.
- Teak Brightener (17 oz) mixed 1:1 yields about 34 oz (about 1 liter) of brightening solution, generally sufficient for a small to medium set unless the wood is severely weathered.
- Teak Oil (17 oz) typically covers approximately 25–50 sq ft (2–4.5 m²) per bottle per coat, depending on porosity and how liberally you apply it.
You’ll most likely need multiple bottles of oil if you have a large dining set or multiple pieces to re-oil, especially because the manufacturer recommends three coats for best results. The cleaner and brightener create more working solution after mixing, so they often go further than the oil in terms of raw quantity.
Practical coverage tips
If you’re working on a single teak lounge chair or a side table, you’ll probably use one bottle of oil for three coats. For a full outdoor dining set with several chairs and a table, plan on two to three bottles of oil. Always buy a little extra to allow for a second pass on thirsty wood or touch-ups.

This image is property of Amazon.com.
Durability and maintenance schedule
The kit is designed for annual maintenance: clean and re-oil garden or pool furniture once a year to maintain color and protection. You only need to use the brightener when the furniture has weathered or if you skipped oiling for a season; otherwise, annual cleaning and oiling will keep the wood looking good.
In high-UV or coastal environments you may need to do maintenance more frequently, or add a light mid-season wipe-down to remove salt or grime. Regular maintenance prevents deep greying and reduces the amount of effort needed for future restorations.
Pros
You’ll appreciate a few clear strengths of this kit: it’s comprehensive, brand-matched, and easy to follow. The three-step system gives predictable, repeatable results when you stick to the instructions and allow proper drying between steps.
Other pros to note:
- The bottles are a convenient size for household projects and reduce waste compared with larger industrial containers.
- Matching cleaner, brightener, and oil reduces the risk of incompatible chemistry that can happen when you mix brands.
- The kit is good value for someone doing routine maintenance on a few pieces, and it scales up if you buy additional oil bottles.

This image is property of Amazon.com.
Cons
There are a few limitations you should be aware of: the kit lacks application tools, the oil quantity may be insufficient for large sets, and very neglected or damaged teak may require sanding or multiple product passes. You’ll need to buy scrub brushes, lint-free cloths, and potentially extra oil to complete a large job.
Additional drawbacks:
- If you’re looking for a completely hands-off or instant solution, this kit is still manual and takes time for drying and multiple coats.
- Very dark stains, deep mold, or ingrained discoloration might require extra mechanical sanding or professional attention beyond what the kit provides.
Safety and environmental considerations
You should always wear gloves and eye protection when handling cleaners and brighteners, and ensure good ventilation if you’re working indoors or in a covered area. Dispose of used rags and excess oil according to local regulations — oily rags can be combustible if left balled up, so lay them flat to dry or store in a metal container before proper disposal.
The cleaner and brightener contain active chemicals designed to remove tannins and grime, so avoid direct discharge into garden beds or storm drains; rinse water should be directed away from sensitive plants and pooled areas when possible. Read and follow the product labels for the most accurate safety and disposal instructions.
Tips and tricks for best results
You’ll get better results if you follow a few practical tips:
- Always test a small hidden area first to see the color outcome and check for adverse reactions. This protects you from surprises on expensive pieces.
- Work in shaded conditions or early morning/late afternoon to avoid rapid drying that can lead to uneven application. Direct sun can make cleaners and oils dry too fast and create lap marks.
- Apply oil in thin, even coats and always wipe off excess. Thick layers sit on the surface and can remain tacky for longer.
- If your teak is heavily greyed or has rough patches, lightly sand with fine-grit sandpaper (180–240 grit) along the grain before cleaning; then clean and brighten as directed.
- For slatted furniture, work from the top down and use smaller cloths or foam brushes to reach tight gaps.
Following these tips prevents common mistakes and helps you achieve a professional-looking finish without professional costs.
Troubleshooting common problems
If the wood looks blotchy after oiling, you likely applied oil too thickly or in direct sun; remove excess with a clean cloth and allow it to fully cure, then sand lightly if necessary and recoat. If brightening doesn’t remove the grey, the wood may be heavily oxidized — repeat the cleaning and brightening sequence or consider light sanding first.
If you notice a sticky surface after oiling, that usually means too much oil remained on the surface. Wipe again with a clean lint-free cloth and give it more drying time in warm, ventilated conditions. If mold or black stains persist, use a targeted mold cleaner or consider a professional restoration for severe damage.
Comparing this kit to other options
Compared with standalone teak oils or generic wood cleaners, this kit’s main advantage is that all components are designed to work together in a three-step process. Standalone oils may nourish wood but won’t remove grey tarnish without a compatible cleaner and brightener; conversely, cleaners alone won’t protect wood for the season.
If you want a simpler approach and are only touching up small areas, buying a single bottle of teak oil may be enough. If you’re restoring multiple pieces or want the best visual and protective outcome, a matched kit like this typically delivers more consistent results.
Alternatives to consider
You might prefer:
- A professional-grade kit with larger quantities if you’ve got lots of furniture.
- A ready-to-use oil in spray form for quick touch-ups (less penetration, more convenience).
- A sealer or varnish if you want a film finish rather than an oiled, natural look (but those change appearance and can require sanding before refinishing).
Choose based on the look you want and how much time you’re willing to spend doing maintenance.
Who should buy the Furniture Clinic Teak Care Kit
You should consider this kit if you own teak patio furniture and prefer to maintain a natural oiled look rather than painting or sealing. It’s ideal for homeowners who are willing to perform annual maintenance and who want a single, matched solution that handles cleaning, color restoration, and protection.
Avoid this kit if you want a high-gloss film finish, if your furniture is painted, or if you immediately need professional-grade restoration for extreme damage. For everyday maintenance and periodic restoration, though, it’s a solid, user-friendly choice.
Cost and value considerations
The kit offers value if you compare the combined cost of cleaner, brightener, and oil purchased separately. Its mid-size bottles are convenient and reduce waste for small-to-medium jobs, but for very large sets the cost per square foot increases because you’ll likely buy extra oil.
You can stretch value by doing a full-season maintenance schedule: clean and oil annually, use the brightener only when needed, and buy individual oil bottles as extras when you expand your maintenance plan. That way you avoid overbuying and keep costs down over time.
Storage and shelf life
Store the unopened bottles in a cool, dry place away from direct sunlight and freezing temperatures. Once opened, reseal tightly and use within the timeframe suggested on the label — generally a year or two depending on storage conditions.
If oil becomes thick or smells different after long storage, consider replacing it; contaminated or degraded oil won’t penetrate or protect effectively. Cleaners and brighteners tend to keep longer once unopened, but mixing them into buckets and leaving leftovers is not recommended.
Environmental and long-term impact
By using a kit that focuses on cleaning and oiling rather than sanding and chemical stripping, you minimize material waste and reduce the need for harsher treatments. Regular maintenance prolongs the life of teak furniture, which is both economical and environmentally sensible compared with replacing pieces frequently.
However, be mindful of proper disposal of rinse water and used materials, and favor localized cleaning to prevent runoff into landscaping. Choosing to re-oil and maintain instead of replacing furniture helps you make a lower-impact choice over the long run.
Final verdict
If you want a straightforward, three-step approach to maintain and restore teak outdoor furniture, the Furniture Clinic Teak Care Kit | For Teak Outdoor Wood Patio Furniture | Clean, Brighten, Nourish, and Protect Treated and Untreated Wood | Contains Cleaner, Brightener, & Oil is a sensible choice. It’s especially good for homeowners doing annual upkeep or restoring lightly to moderately weathered pieces.
Plan on picking up a few extra supplies—lint-free cloths, scrub brushes, a bucket, and possibly additional oil for larger sets—but otherwise you’ll find the matched components make the process predictable and the results consistent when you follow the directions.
Frequently asked questions (FAQ)
Q: How often should you use the brightener? A: You should use the brightener when the wood looks noticeably weathered or grey, not necessarily every year. If you stay on an annual clean-and-oil schedule, brightening is often only needed every few years or after heavy weathering.
Q: Can you use this kit on indoor teak furniture? A: Yes, but ensure you work in a well-ventilated area and protect floors from drips and spills. The cleaner and brightener are formulated for outdoor grime, so they may be stronger than needed for indoor dust.
Q: Is three coats of oil really necessary? A: Three thin coats are recommended for best penetration and protection, but you can often achieve acceptable results with two coats on less porous wood. More coats may be needed for very porous or dried-out teak to reach a fully saturated, even finish.
Q: What do you do about stubborn grey or black stains? A: Try repeating the cleaner and brightener steps and, if needed, lightly sand along the grain before repeating the sequence. For severe stains or mold, a targeted mold cleaner or professional restoration may be required.
Q: How long does the oil take to dry between coats? A: Allow about 4–6 hours for oil to dry before applying another coat under normal conditions. Cooler or more humid weather may extend drying times, so plan for a full day between coats if conditions are less than ideal.
Q: Can you apply oil in direct sunlight? A: It’s best to avoid direct sunlight because it speeds drying unevenly and can leave lap marks. Work in shade or during cooler parts of the day for the most even finish.
Q: Are lint-free cloths necessary? A: Lint-free cloths help avoid leaving fibers in the oil and create a smoother finish. You can use tightly woven cotton rags in a pinch, but they may leave more lint and affect appearance.
Q: How do you dispose of used cloths containing oil? A: Lay them flat to dry outdoors in a safe, ventilated space or store in a metal container before disposing according to local regulations. Oily rags can self-combust if bunched up while wet, so handle them carefully.
Q: Does the kit protect against UV? A: Teak oil provides some protection by nourishing the wood and reducing moisture absorption, but it’s not a full UV-blocking sealant. You’ll see reduced UV damage compared to untreated wood but may still need to reapply annually in sunny climates.
Q: Can you mix this oil with other oils? A: It’s not recommended to mix different oil brands because additives and curing properties can be incompatible. Stick with a single brand for your oil coats to ensure predictable performance.
If you have specific questions about a particular piece of furniture or a tough restoration job, tell me about the item’s condition and your climate and I’ll help you map out a step-by-step plan for the best outcome.

Disclosure: As an Amazon Associate, I earn from qualifying purchases.


Christopher Knight Home Esme Outdoor Acacia Wood Bench, Teak Finish
27% Off


Furniture Clinic Teak Oil | Wood Oil Protects & Cleans Outdoor & Indoor Furniture, Boats, Shower Benches | Restore & Protect Wood, Prevent Drying & Other Damage | Natural Matte Finish | 17oz/500ml
10% Off
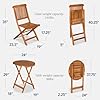


Best Choice Products 3-Piece Acacia Wood Bistro Set, Folding Patio Furniture for Backyard, Balcony, Deck w/ 2 Chairs, Round Coffee Table, Teak Finish - Natural
11% Off

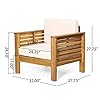


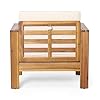
Christopher Knight Home Louver Club Chairs, Teak + Cream
$390.99 (as of March 6, 2026 02:24 GMT -05:00 - More infoProduct prices and availability are accurate as of the date/time indicated and are subject to change. Any price and availability information displayed on [relevant Amazon Site(s), as applicable] at the time of purchase will apply to the purchase of this product.)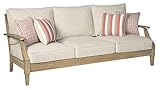


Signature Design by Ashley Clare View Outdoor Patio Sofa, 4 Throw Pillows, Nuvella Weather Resistant Fabric, Eucalyptus Wood, 81" W x 35" D x 32" H, Beige
$1,369.99 (as of March 6, 2026 02:24 GMT -05:00 - More infoProduct prices and availability are accurate as of the date/time indicated and are subject to change. Any price and availability information displayed on [relevant Amazon Site(s), as applicable] at the time of purchase will apply to the purchase of this product.)


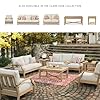
Lokingrise 4-Piece Deep Seating Teak Wood Patio Furniture Set, Acacia Wood Outdoor Conversation Sofa Set with Cushioned Loveseat, Armchairs and Coffee Table for Garden, Deck, Backyard
$859.99 (as of March 6, 2026 02:24 GMT -05:00 - More infoProduct prices and availability are accurate as of the date/time indicated and are subject to change. Any price and availability information displayed on [relevant Amazon Site(s), as applicable] at the time of purchase will apply to the purchase of this product.)

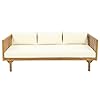

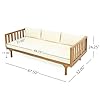
Merax Outdoor Acacia Wood Conversation Set, 3-Seat Loveseat Sofa w/Coushion and Round Coffee Table for Backyard, Patio Furniture, Teak+Beige
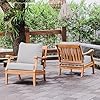
$519.99 (as of March 6, 2026 02:24 GMT -05:00 - More infoProduct prices and availability are accurate as of the date/time indicated and are subject to change. Any price and availability information displayed on [relevant Amazon Site(s), as applicable] at the time of purchase will apply to the purchase of this product.)![[3 PIECE SET] This patio conversation set includes: 2 patio lounge chairs and 1 patio side table. [PREMIUM TEAK WOOD] Sourced from sustainable forests, our patio conversation set is expertly crafted from high-quality teak wood, ensuring both durabili...](https://m.media-amazon.com/images/I/61RlGdGcaiL._SL160_.jpg)


Cambridge Casual Robin Teak Wood 3 Piece Patio Conversation Set with Oyster Cushion
$994.70 (as of March 6, 2026 02:24 GMT -05:00 - More infoProduct prices and availability are accurate as of the date/time indicated and are subject to change. Any price and availability information displayed on [relevant Amazon Site(s), as applicable] at the time of purchase will apply to the purchase of this product.)


PURPLE LEAF 11 Pieces Patio Dining Set Wicker Outdoor Furniture Rectangular Table and Chairs Set for Garden Deck Teak-Finish Aluminum Frame Backyard Kitchen Set, Cushions and Pillows Included
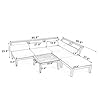
$2,099.00 (as of March 6, 2026 02:24 GMT -05:00 - More infoProduct prices and availability are accurate as of the date/time indicated and are subject to change. Any price and availability information displayed on [relevant Amazon Site(s), as applicable] at the time of purchase will apply to the purchase of this product.)![[Versatile Outdoor Modular Sofa Set] This 6-piece acacia wood patio furniture set features a customizable L-shaped configuration with 3 armless chairs, 1 corner sofa, 1 ottoman, and 1 tea table – ideal for dynamic outdoor entertaining. The modular de...](https://m.media-amazon.com/images/I/51CUH9Yb9gL._SL160_.jpg)


Merax 6 Pieces Patio Furniture Set, Outdoor L-Shaped Sectional Sofa Set with Coffee Table, Acacia Wood Conversation Seating & Cushions and Lumbar Pillows, for Garden, Poolside and Backyard, Teak+Beige
$899.99 (as of March 6, 2026 02:24 GMT -05:00 - More infoProduct prices and availability are accurate as of the date/time indicated and are subject to change. Any price and availability information displayed on [relevant Amazon Site(s), as applicable] at the time of purchase will apply to the purchase of this product.)
Now retrieving an image set.
FDW Wicker Outdoor Furniture Patio Furniture Set of 3 Rattan Patio Chairs Outdoor Chairs Patio Conversation Set with Coffee Table for Yard Backyard Lawn Porch Poolside Balcony,Black
$79.99 (as of March 6, 2026 17:36 GMT -05:00 - More infoProduct prices and availability are accurate as of the date/time indicated and are subject to change. Any price and availability information displayed on [relevant Amazon Site(s), as applicable] at the time of purchase will apply to the purchase of this product.)
Now retrieving an image set.
Shintenchi 3 Pieces Patio Bistro Sets, Outdoor Textilene Fabric Conversation Bistro Set, Textilene Fabric Front Porch Chairs Small Patio Furniture Set with Table for Lawn,Garden,Balcony (Black)
$84.46 (as of March 6, 2026 17:36 GMT -05:00 - More infoProduct prices and availability are accurate as of the date/time indicated and are subject to change. Any price and availability information displayed on [relevant Amazon Site(s), as applicable] at the time of purchase will apply to the purchase of this product.)
Now retrieving an image set.
Devoko Patio Porch Furniture Sets 3 Pieces PE Rattan Wicker Chairs with Table Outdoor Garden Furniture Sets (Brown/Beige)
$89.99 (as of March 6, 2026 17:36 GMT -05:00 - More infoProduct prices and availability are accurate as of the date/time indicated and are subject to change. Any price and availability information displayed on [relevant Amazon Site(s), as applicable] at the time of purchase will apply to the purchase of this product.)
Now retrieving an image set.
LEVELEVE Balcony Furniture 5 Piece Patio Conversation Set, PE Wicker Rattan Outdoor Lounge Chairs with Soft Cushions 2 Ottoman&Glass Table for Porch, Lawn-Brown Wicker
$149.99 (as of March 6, 2026 17:36 GMT -05:00 - More infoProduct prices and availability are accurate as of the date/time indicated and are subject to change. Any price and availability information displayed on [relevant Amazon Site(s), as applicable] at the time of purchase will apply to the purchase of this product.)
Now retrieving an image set.